


Integration Setup Using Gerrit and Jenkins
The life of a developer can get a bit monotonous with the repetitive and complicated tasks. Thankfully, we have tools that can regularly handle the mundane tasks without ever complaining once you set them up. When you add automation to testing and deployment, the solution can be called a “continuous integration”. Such a setup can automatically test and deploy projects, giving you more time to focus on writing code than pushing it to the servers. Here is how you can move ahead with a continuous Integration Setup using Gerrit and Jenkins. 
What is Gerrit?
Gerrit is a git-based open-source code review system that has a web-based interface that lets you push changes from a git client, review changes and auto-merge with the master code. Every time a change is made, patch sets for the same are made. Gerrit allows different patch set comparisons. It also has the option to add feedback or review on specific lines, or on the entire patch. Reviewers can rate the changes with one from below: +2 – Looks good to me, approved. +1 – Looks good to me, but someone else must approve. 0 – No score. -1 – I would prefer that you didn’t submit this. -2 – Block submit. A +2 review implies the code can be submitted to the master by default. This can be configured as required.
What is Jenkins and its Uses?
Jenkins is a popular build server used for continuous Integration Setup. It is web-based and allows build process automation as and when changes occur. Jenkins can work independently, even without Git or Gerrit. It has hooks that allow event triggers, so when a change occurs, a build is made automatically. When Jenkins and Gerrit are used together, the builds will have a success/failure mark to indicate if they have passed the tests. Jenkins will run the test regression after performing a build. Once complete, it will publish the test results just like one of the reviewers. In case the build fails, it will reject the patch. You can set either a -1 or a -2 depending on the quality of your CI in an event of test failure. Along with this, other code reviewers can also review the code at this point. If all the reviews have passed, the code can be pushed to a public repository.
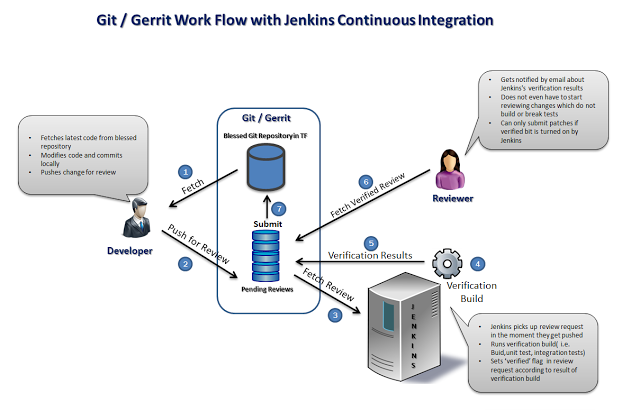
Workflow for Continuous Integration
- Developer checks out source from Git
- Developer makes the required changes
- Developer pushes the changes to Gerrit
- Gerrit sends change notice to Jenkins for Integration Setup test
- Jenkins pulls changes directly from Gerrit git server and run all test cases as per our project configuration
- Other developers review the changes and approve (+2)
- Gerrit merges the changes to master project git repository when Jenkins have passed the build and changes are approved by other developers
 1. Installation of Gerrit
 1. Installation of Gerrit
- Requirement: JRE, minimum version 1.8.
If you have MySQL, you can use it for the Gerrit database. Create users and databases in MySQL for Gerrit.
mysql> CREATE USER ‘gerrit2’@’localhost’ IDENTIFIED BY ‘secret’;
mysql> CREATE DATABASE reviewdb;
mysql> GRANT ALL ON reviewdb.* TO ‘gerrit2’@’localhost’;
mysql> FLUSH PRIVILEGES;
Now run the below command to initialize the site.
# java -jar gerrit.war init –batch -d ~/
During this initialization, the gerrit service is started by default. If you want to make any changes i.e mysql database, login authentication, send email server and httpd url, you can edit the ~//etc/gerrit.config file and add the ldap and database password details in the ~//etc/secure.config file. If any settings changes are made, the gerrit service must be restarted before they will take effect.
# ~//bin/gerrit.sh restart
Copy the ~//bin/gerrit.sh script to init.d dir as gerrit and add it to start while machine boot.
2. Initial Login
Now load your Gerrit URL in the browser. You can find the Gerrit web URL using this command also.
# git config -f ~//etc/gerrit.config gerrit.canonicalWebUrl
Now Use login authentication using the method which you have configured on Gerrit config file to login into the Gerrit web interface. By default, it is OpenID. LDAP is one of the most used authentication methods.
Once you have successfully logged in to the Gerrit Web Page, you must log in to your client machine where you will do the development.You have to generate RSA keys for your ssh sessions. You can skip the key generation step if you already have the files.
# ls -l ~/.ssh
authorized_keys config id_rsa id_rsa.pub known_hosts
3. SSH Key Generation
# ssh-keygen -t rsa
Generating public/private rsa key pair.
Enter file in which to save the key (/home/user/.ssh/id_rsa):
Enter passphrase (empty for no passphrase):
Enter same passphrase again:
Your identification has been saved in /home/user/.ssh/id_rsa.
Your public key has been saved in /home/user/.ssh/id_rsa.pub.
The key fingerprint is:
SHA256:dMMVqsoLDf8T/d5Niob69oea3rkSLTBltiZ8s1lbdeA user@localhost
The key’s randomart image is:
+—[RSA 2048]—-+
| o… |
| .+o . o|
| ..+=. E..|
| .=o=.. . |
| . SB * o |
| = .. * o |
| . = . = . .|
| . o. +o++.+ |
| . o*=*Boo .|
+—-[SHA256]—–+
# cat ~/.ssh/id_rsa.pub
ssh-rsa AAAAB3NzaC1yc2EAAAADAQABAAABAQCwoWTT6S1pv2LP0l6r8305njSLtoupDCw8Df
GnaqW+ppfzNMtRJmAvCQpYuvE154EsGZC5csnRkUYAScOD3nri8NBsXMdD+m1mMyD
lA4ssMLhWHfstJGQ5aJ84NIR+zFK9o9QmDCVYU/
MYt2SZnmzi+Pdd4QbDWKisewmtun5rpy8vXWukKt9CHGTbv5lKyRVPF
LuQCynKbniZLV7aQD6gsVcZFG7Hj3ezBhDAZdBrCWLldy0S61DAmdH5C94xmlSuraq
HiX0pkLi4J67msvOUW6dBfeCP1VsMNz0j/
91LPlOMf5I2r1fRw1s/J1z/
UcsgBDyATwSKocNklkrd8+pp user@localhost
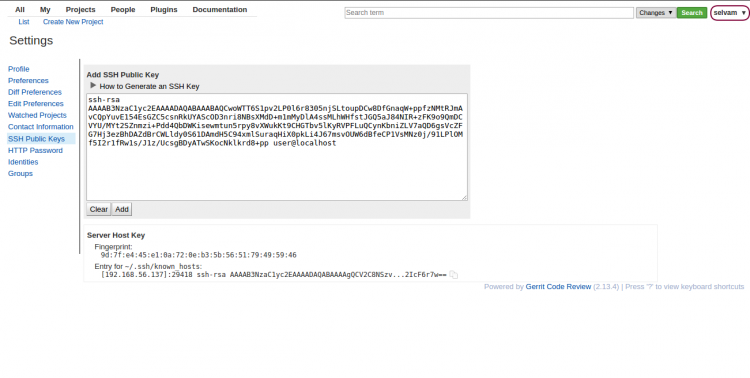
- Copy the above public key and go to your gerrit web url
- Check the username on right corner of the web page and click on your user to find the settings link
- In the left side, you can find the “SSH Public Keys”, click on it
- Now click “Add Key” button, paste your ssh public key and Add it
 The first user to sign-in and register an account will be automatically placed into the fully privileged Administrators. Now you have privileges to create projects. Click the “Projects” Tab and click ‘Create New Projects”. Now Enter the project Name to start.
 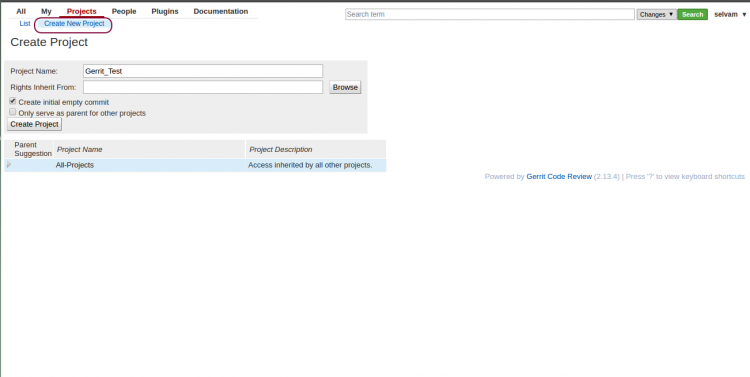 There you go, clone the project in your system and start adding your development codes. # ssh selvam@192.168.56.137 -p 29418
| **** Welcome to Gerrit Code Review **** Hi selvam, you have successfully connected over SSH. Unfortunately, interactive shells are disabled. To clone a hosted Git repository, use: git clone ssh://selvam@192.168.56.137:29418/REPOSITORY_NAME.git Connection to 192.168.56.137 closed. |
# git clone ssh://selvam@192.168.56.137:29418/Gerrit_Test
4. Installation of Jenkins
You can install jenkins using apt-get or deb package.
- sudo apt-get update
- sudo apt-get install jenkins
Jenkins config exists in /etc/default/jenkins, where you can change java location and JAVA_ARGS. By default, jenkins runs on 8080. If you are running gerrit and jenkins on same machine, the default port 8080 is already occupied by gerrit. Here you need to change the jenkins port. To change it, edit the HTTP_PORT value to run on a different port.
5. Start the Jenkins process
# /etc/init.d/jenkins start Go to your browser and the load the jenkins page with your jenkins hostname and port number.
https://:/
If you have installed Jenkins 2.*, the jenkins webpage will ask the initialAdminPassword. You can find the password in the /var/log/jenkins/jenkins.log file. The log looks like below:
| Jenkins initial setup is required. An admin user has been created and a password generated. Please use the following password to proceed to installation: f16b093akcnml397jcdoa239d6bafb9 This may also be found at: /var/lib/jenkins/secrets/initialAdminPassword |
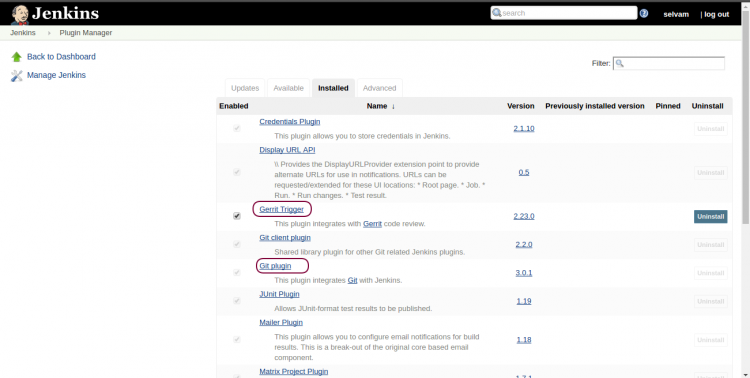
- Now go to Jenkins -> Manage Jenkins -> Plugin Manager to install the git and gerrit plugin in jenkins
- Click the ‘Available’ tab and search ‘Git Plugin’ and Click ‘Install Without restart’. Again search ‘Gerrit Trigger’ and Click “Install Without restart’. Finally, check if it is in the installed list.
 Jenkins process is run by jenkins user. So, we need to enable access for jenkins user in gerrit.
- Using your authentication method, create jenkins user in gerrit
- Now create ssh-keygen for jenkins user as we did previously. But this time, create the key with empty passpharse and copy the public key for jenkins user in the gerrit
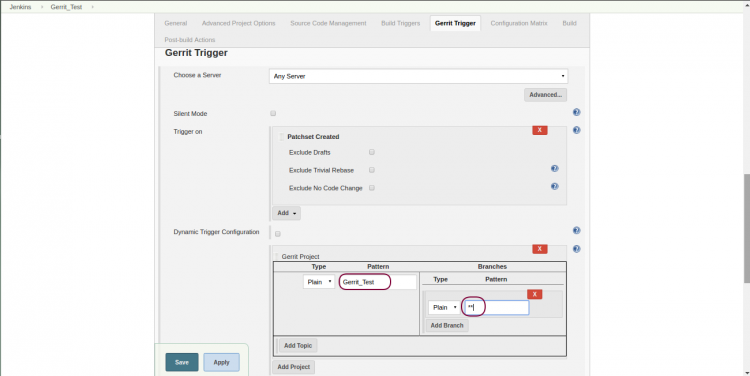
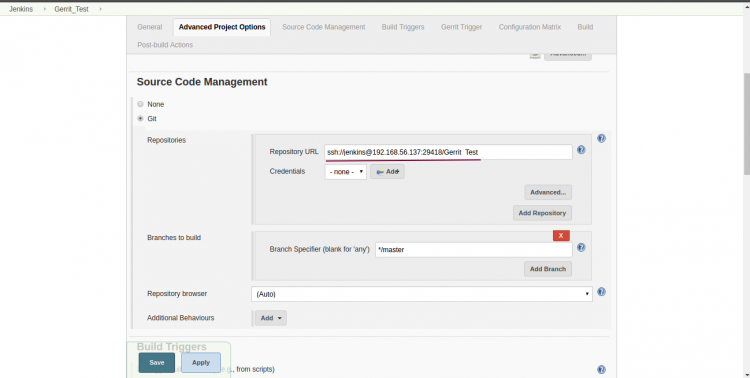
- Now click ‘New Item’ to create a new job and add your git url in the Source Code Management/Git section. Also, choose the “Gerrit event” in the Build Triggers and enter the Gerrit Project Pattern.
 Finally, Save the configuration. Perfect, your Gerrit and Jenkins setup is now complete.